Thursday, July 17, 2014

Don't call them "Little Dudes"

So I've been collecting and painting RAFM's "Shadows and Steel" boxed sets. These are boxed sets of adventure parties with a module and some background fluff. Clearly set up for D&D although not directly referenced (back when TSR was serious about their IP). Anyway, there were four sets and I finally put together the last one.

Presenting: The Conquistador Dwarves!

The Conquistador Dwarves

These guys may not be the sharpest axes in the woodshed, but they make up for it with enthusiasm.

Pascale and Torquemazda

Pascale is their fearless leader with sword, shield and classy helmet. He is ably assisted by Torquemazda who will bring the Holy Word to heathens everywhere.

Guernica with Salvidora and Paulo

But Dwarves are better in short sprints, for long-distance, the team counts on Guernica, the monster lizard. Riding atop in the box we have Salvidora (with the spear) and Paulo covering the rear with his crossbow.

Crandall

Finally, to help them punch above their weight we have Crandall with his steam cannon.

These guys were fun to paint up and they weren't much bigger than the 15mm stuff I've been doing earlier this year. I'm sad the project is at an end, but I wanted to put together my own adventuring party. I've purchased the figures (from Reaper rather than RAFM) and we'll see how they turn out. later Tom

Thursday, April 24, 2014

The Greatest Little Dudes

Hey,

So in January, some of the guys down at the store started playing Chain of Command, a platoon-sized WW2 skirmish game. People had sort of settled on Bolt Action as their go-to ruleset for this (and indeed, I painted up a bunch of 28mm Soviets), but Chain of Command really blew me away. There's a real focus on good tactics and the fog of war. There's also a short pre-game "patrol phase" where both sides maneuver to set up "jump-off" points where their forces will enter during the actual game. This eliminates a lot of the tedious early maneuvering most games have and basically sets your forces up within shooting distance of the enemy.

A fun game and the guy championing this stuff has mostly 15mm figures. That's good, 15mm is sort of my preferred scale (since my bad paint jobs aren't as noticeable) so I figured I'd paint up a platoon.

In the past two months I've done 4. So I've painted over 120 figures and can field a platoon for every major combatant of WW2 in Europe. So...I think I'm into this game. At any rate, here's a dump of photos showing off everything:

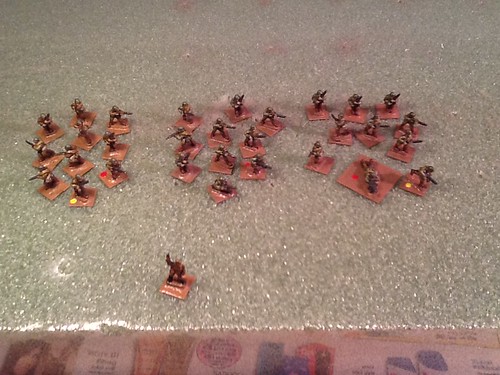
 First up, the Americans:

WW2 American Rifle Platoon

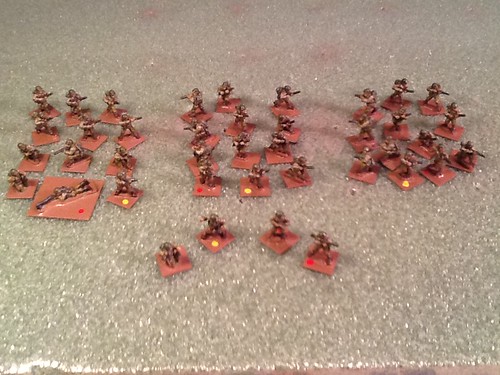
Here's the full platoon in all it's glory. The Americans have lots of guys and a smattering of support. The large squads can soak losses pretty well and remain functional.

WW2 American Rifle Squad

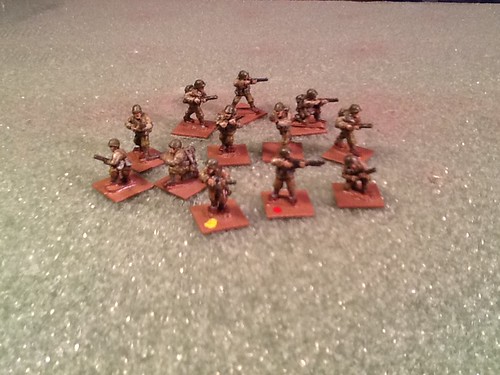
Each squad has a leader, a BAR team and 9 grunts. The BAR was a pretty sub-par squad support weapon, but it was easy to fire on the move.

WW2 American Platoon HQ

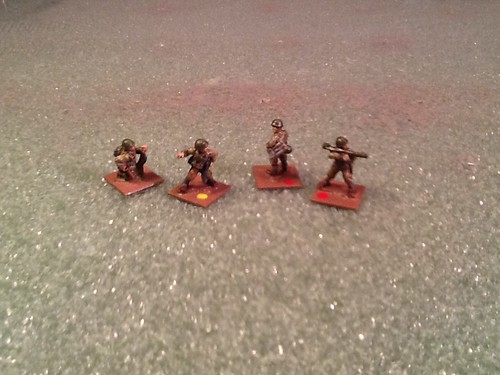
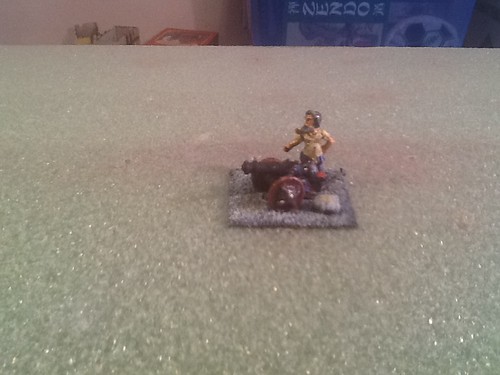
Finally, the Platoon HQ with the Platoon Leader and Platoon Sgt. (the pack I bought didn't have one, but it did have a spare rifleman so he's the new top NCO). The HQ also has the squad's anti-armor support with a two man bazooka team. I thought the bazooka itself was a little small, but some internet research suggests it's about right. Anyway, the HQ provides some much-needed flexibility.

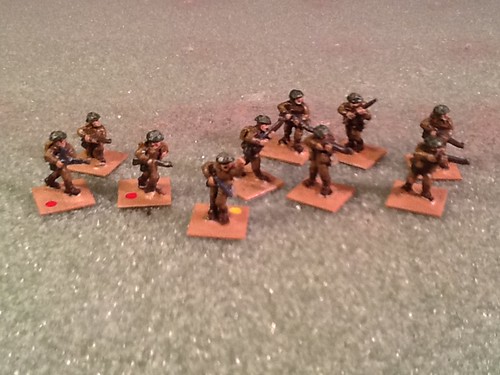
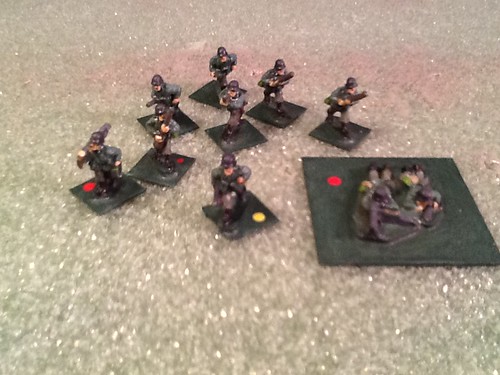
 Next up are the Soviets. And now I have the same basic troops in two different scales (15mm and 28mm)...I'm becoming a true wargamer!

WW2 Soviet Platoon

Here's the whole platoon. Actually, the pack of figures I bought comes with a whole bunch of extra guys. I had enough dudes left over to make a fourth squad of guys and a small SMG team. With a couple more support weapons and a tank, I could replicate my 28mm Bolt Action Soviets and run the game in 15mm if I chose. 

But for Chain of Command, you get a platoon leader and three big squads. Like the Americans, they take a lot of hits before they break. Their LMG team is a bit better than the BAR the Americans use, but there are no support units of any sort. To make up for that, the Soviets will usually get a nice pick of support options to bulk out their forces before the game starts.

WW2 Soviet Rifle Squad and Platoon Leader

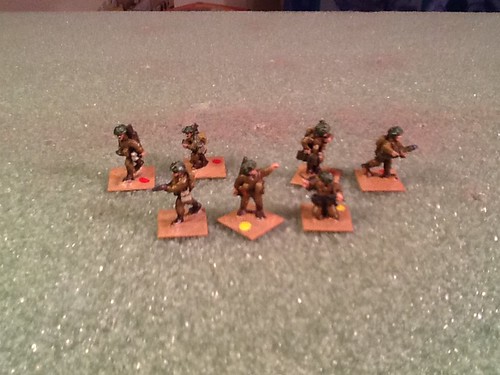
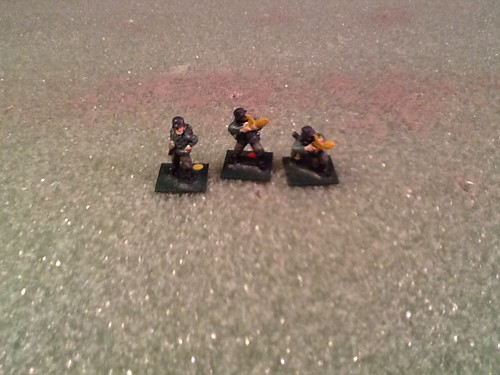
Here's a single Soviet quad and the platoon leader (there's really no one else in the platoon HQ). You get a leader, an LMG team and 8 troopers. The squad has some flexibility to detach scout teams, but mostly it just wants to roll over the opposition. Again, the Soviets hope for a mass of support options to beef up their firepower.

 And now for something completely different...

WW2 British Rile Platoon

A group shot of the British platoon. The British platoons are a sort of jack-of-all trades. The platoons have a little fire, a little movement, a little artillery and a little anti-tank. The squads can take a few hits, but they won't take a real pounding and have to use everything at their disposal to win. I'm curious to give these guys a go since I think they need a delicate touch to be used well, but once you understand how to use them, they'll be a real menace in the field.

WW2 British Rile Squad

So the rifle squad is very firmly centered on a fire and movement doctrine. The Bren team set up a very accurate base of fire while the rest of the squad moves around to flank and close with the enemy. The only question is where do you place the squad leader? Ideally, he should be with the maneuver unit ready for the final charge, but keeping him back with the Bren to direct fire is a good idea too.

WW2 British Platoon HQ

The British Platoon HQ is where the Brits keep the good stuff. The Platoon leader also has a Platoon sergeant who gives the force a lot more command and control options than other forces. There's also a PIAT team who can take their spring-loaded mayhem machines and try for a flank shot on a panzer. The HQ also has a 2" mortar team (only the British platoon have organic artillery pieces). The mortar can fire explosive rounds but is probably better employed in dropping smoke to cover the advance of other members of the platoon. Again, how the British makes use of all his toys will probably determine victory or defeat.

And finally, some Germans for all those other guys to fight.

WW2 German Panzergrenadier Platoon

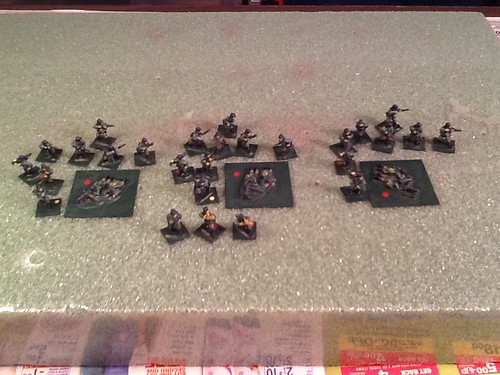
For the Germans, I put together a Panzergrenadier platoon. This formation has proven to be an interesting opponent. Although the platoon is smaller that the other forces described above, each squad comes with two LMG teams. This means that when a squad fires, it's rolling buckets of d6s and putting a serious hurt on opponents.

WW2 German Panzergrenadier Squad

And here you can see the platoon. Two LMG teams but only five troopers. If you can get a few hits on this squad it starts breaking down pretty fast, but getting those hits is a real challenge. On the attack, the squad can make effective use of bounding fire to approach a target. Dug-in on the defense, they're almost impossible to shift. They're always an interesting problem to solve.

WW2 German Panzergrenadier Platoon HQ

The Platoon HQ for the Panzergrenadiers is a little thin. There's no Platoon Sgt. like the Americans and Brits have so the Germans can run into Command and Control problems. The HQ also contains the platoons anti-armor support in the form of a panzershrek team. Alas, I couldn't find the right figure pack for that, so two panzerfaust-wielding troopers are standing in.

Like I said, that's some 120+ little dudes in two months and now I can field a basic force for pretty much any ETO game. Although my photos continue to be crappy, I'm really happy with how these guys came out. I tried a few new things and I think my painting has really improved in this batch of figures. The improvements basically boil down to two things.

One: I used a bigger brush. Until now, when I paint 15mm the idea was "smaller figures, smaller brushes" and it works ok, but after watching a few videos I did all of these with a larger brush. I say "larger" but it's still pretty small (a size 0 brush instead of a size 3/0 brush -- apparently you can divide by 0 when you're doing art). In the past, I found this larger brush to be too big, but apparently my brush control has improved to the point where I can effectively use the larger brush. This has made things go faster and the brushes have lasted longer than the smaller ones.

Two: I did a lot more highlighting this time around. Normally I block out the basic colors, brush on the shade and that's about it, but this time I really added some serious highlights. This has made the figures really pop. They look a bit funky up close but on the table they look really good.

So I'm happy to see that practice does make perfect.

So that's how I've been spending my free time the past couple of months. I need to paint up some vehicles for each of these groups (and maybe add a few more support troops), but I'm ready to give this a rest for a bit. The next item on my docket is the last of the RAFM Shadows and Steel boxed sets I've been working at on and off the past couple of years -- The Conquistador Dwarves! Should be a fun project.

Tuesday, January 7, 2014

Stopping the Hun

Hey,

 So back in the Spring of last year, I painted up a mess of Soviet troops in 28mm for Bolt Action games. Since then, they've never made it to the table and I've fallen in love with Chain of Command for small action WWII games...and the scale of choice for the guys who play that is 15mm.

 BUT! Last Saturday my gaming group had their belated Holiday party and ran Bolt Action games all day. In the morning, my Soviet soldiers made their tabletop debut... We rolled up a scenario and my job was to defend a set of three objectives spread out over my side of the table. My opponents would be trying to wrest away as many as they could in six turns. I had the pleasure of setting up first:

Bolt Action Set-up 4

Here you've got a long shot of my line at set-up with my left flank at bottom and my right flank at the top. We were spread out over a long ridge that overlooked a small town and some forrest area. The Germans have to push up the hill and take as many of the objective markers as they can.

Bolt Action Set-up 3

In Bolt Action, the Soviets get a free squad of Inexperienced troops to bulk out their forces. I placed that squad on my left flank along with a 2nd Lieutenant and his flag bearer to help rally the troops. I also gave them some confidence by placing my T-34/76 tank. It was also the only place with a break in the hedge line that would allow the tank to get out onto the road before it and move where it needed to be. Those barrels mark the position of an objective.

Bolt Action Set-up 2

In the center of my set-up area, I placed a regular infantry squad and the mortar team. The tank in back isn't functional and acts as another objective point.

Bolt Action Set-up 1

On the right, I looked out over a small town. This provided the most cover for an approaching enemy so I bulked up on this side. There are two squads of infantry, a machine gun team, a sniper and a Captain to help provide morale and activation bonuses to the various groups. The crate on a silvered disk marks the final objective.

 The game began with an artillery bombardment. This kind of artillery bombardment can be deadly, but most of the time it's just an annoyance. It puts a few points of shock on your groups and this can make it harder for them to activate (or you can waste a turn trying to rally it all off of them). Considering how far the attackers have to run to get at you, it's mostly a nuisance. The only real effect the barrage had was to kill the sniper. A small bit of irony there. The loud booms also scared the tankers who botched their activation test and froze up for a turn.

 For most of the turn I just put people on overwatch. I did send the machine gun team down the hill to take up positions behind some crates near the crossroads in town. I also started feeding a squad in from the far right into the building next to it and got the mortar team's forward observer into a building to try and direct some fire.

 The Germans had small squads of Veteran troopers with lots of machine guns and almost all of them started moving into the town with one squad on my left moving behind some woods to approach the town from that direction.

 The also sent a Stug down the street right towards the MG team.

 By the end of turn 2, things looked like this:

Bolt Action Turn 2

The tank was finally rolling forward, but I was worried about the German squad swinging in wide from my left. The machine gun team was drawing a lot of fire, but hanging in there. The squad in the house next to it kept growing as its members dashed down the hill to jump in. They exchanged a lot of fire with the German squad just up the street from it. And still the Stug closes....

Bolt Action Turn 3

On Turn 3, the machine gun team finally succumbed. The Germans sent a squad around the right side of the town and tried to bring down the forward squad in a withering hail of fire. They did catch a few brave soldiers trying to reach the safety of the building but the squad (in the building with the blue dice next to it) was largely intact. They returned fire and crippled their assailants. Up on the ridge, the whole Soviet line began to shift over to the right in order to gain a better angle on those Germans in the open and get some reserves ready for the inevitable losses that are soon to come.

Bolt Action Turn 4

Near the start of Turn 4 things are looking a little better. Continued fire on the open German squad has whittled it down pretty sharply. My Forward Observer was driven out of his post by a German rush, although he did manage to kill a couple of guys on his way out (doing more damage than the mortar team ever did). Still, there's that Stug to deal with, my tank is out of position and the Germans are prepared to rush behind it and take my positions.

Bolt Action Turn 4 -- Surprise!

But my brave Soviet troopers have a nasty surprise for the Stug. Every man carries anti-tank grenades for just this purpose. The squad rushes from their house, swarms the tank flinging grenades at it, and then retreats back into the house leaving the Stug shocked and immobilized for the turn. This is exactly why I purchased the anti-tank grenades for the troops and I'm so very pleased I got to use them to such effect on the first game. I suspect future opponents won't drive up so close to me, but making them worry about every knot of dug-in infantry will almost always be to my benefit.

Bolt Action -- Turn 5

  By Turn 5, the fight's gone out of the Germans. That open German squad on the right was wiped out to a man, the Stug either has to retreat or get brutalized by the troops in the house and if it goes forward, my T-35/76 will get a nice shot into its side. In the meantime, it can spray the Germans in the nearby buildings with machine gun fire. If all the Germans rush forward, they'll be cut down rushing up the hill and the survivors are not likely to overpower the large Soviet squads (Close Combat in Bolt Action is pretty decisive). They don't believe they'll be able to get one of the objectives so we call the game there. Victory to the People!

 So, I'm quite pleased that in their first battle, my little dudes acquitted themselves so well. They were pretty well set-up for the defender role. Although my casualties were light (eight men total), I had plenty of extra guys to soak up losses. I was just able to spread pretty thinly across the width of the table, but once the Germans committed, I was able to shift guys over to where they needed to be. If I had been on the attacking side, I'd like to think I could rush a mass over the top of the defenders, but it's always a gamble.

 The only thing that really didn't work out for me was the mortar team. The way mortars work in Bolt Action, you want to attack the same target over multiple rounds (because your odds of hitting get better as you "dial-in" the range). It's designed to make people shift out of their positions as the fire gets more and more effective. Here, the Germans were almost always on the move so you could zero in on them. The mortars would be great if I were on the attack since defenders usually want to stay close to one position. I should look to see if I can swap out the mortar for something else (another machine gun would be nice but I'd also take a small squad of SMG-equipped maniacs).

 So it was a fun game and although I'm shifting away to another system/scale, I think those Soviets will hit the table again in the future.

Wednesday, January 1, 2014

Slightly Larger Dudes of the Far Past

Hi,

 So in the late 80's RAFM put out a series of boxed sets of miniatures under their "Shadows and Steel" line. The idea is that you'd get an adventuring party with a backstory and adventure good to go. Collect all four boxed sets and you'd have a mini-campaign. I picked up a couple of these two years ago and through some ebay action have managed to snag the other two. Last week, I finished the antagonists of the series.

 Behold! The Vampyres of Tandaloor!

The Vampyres of Tandaloor

The terrible overlords of their hidden valley, these Vampyres and their associates are a menace to all living things. Note that we say "vampyres" -- the background text makes it clear that these aren't vampires although they are very similar. In particular, sunlight weakens, but does not destroy them and they have a range of small bonus powers the "canonical" vampire wouldn't have.

 And what fuels their unholy power?

Tandaloor's Coffin

  The coffin -- pardon me -- the "communing bed" of Tandaloor. The large vampyre bloodstone above the gem acts as a focus allowing the vampyre to connect to the Negative Plane and draw strength. Naturally, stealing or smashing the stone will render the vampyre powerless. This is the only piece of "scenery" in the Shadows and Steel set and it's a nice piece. It painted up well, the "gemstone" was a very nice touch, and any fight involving the vampyres is almost certain to revolve around one of these communing beds so it's nice to have one on hand.

 This piece also highlights a new technique I was trying out for this round of figures. The stone paving the coffin sits upon wasn't part of the kit. Instead, I used paper clay to cover a metal base and then scored lines into it in a brickwork fashion. Then I painted and drybrushed it up and got the result you see here. I did this for all the figures but you can most clearly see the results here and I rather like it. I think it has some possibilities outside of simple stonework, but it did take a while to dry out completely so I'm not sure how soon I'll repeat the process.

 Now that they've got a place to lay their head, let's meet the vampyres. Starting with their fearsome leader:

Tandaloor

  This is Tandaloor, High King of the Vampyres. A creature beyond the petty concerns of mere mortals...and fashion. Interestingly, I discovered that what I thought was mauve, wasn't. I envisioned mauve as a kind of dark, reddish-purple-y color. So I was surprised at how pink the paints all were. Still, when I looked at the box art, it was that same bright pink and I think it's actually not too bad after some shading and highlights. The wings were a little tougher. I'm still not super happy with the way the yellow came out although I did undercoat with a dark-yellow to help get the bright yellow to pop out some more and that worked ok.

 In any event, Tandaloor has a +1 magic sword, but honestly, his unarmed attack is 3d8 so he's better off just ripping you to pieces in most cases. He's presented as a cautious, careful opponent which gives an opening to impulsive attackers, but they'd better get the job done fast.

 Then there's Tandaloor's family:

Elvira and Count Nosferatu

  That's Tandaloor's main squeeze Lady Elvira (because it's the 80's of course she is -- I'm a little surprised they didn't try for more of a resemblance). She has a reputation as a deadly practical joker since she's immortal and bored. The fellow next to her is Count Nosferatu a long-time ally of Tandaloor whose gem got a little cracked during a move and now he's playing his vampire role to the hilt. If there's one thing worse than a vampyre, it's a crazy vampyre. He vants to suck your bluud!

 Naturally, someone needs to keep these jokers in line:

Veratu Mikto and Gorte

The guy on the left is Veratu Mikto and despite appearances, he's actually a Vampyre too. He just can't be arsed to maintain a passable human form. As Tandaloor's majordomo, the look help keeps the peasants in line. Again, he's got a +2 magic axe, but his hands do 2d12 so taking away his toys might make you worse off.

 The guy next to him isn't actually part of this box set. It's a figure from Reaper listed as Iks, Overlord Sergeant. He was a random giveaway from Reaper one Gencon long ago and I figured as long as I'm painting up armored skeletons, I might as well do him too. That's why he's on a different base.

 For inclusion in this set, I've renamed him to Gorte and declared that he's a Revenant created by Veratu Mikto to help offset his workload. Mostly Gorte's duties consist of hanging around Count Nosferatu and making sure he doesn't go on a blood-sucking rampage through the valley.

 I really like the way both of these guys came out. I tried out some new shadings on Gorte's magical sword that came out well and I like the splashes of red against the dark metallics.

 But it's not all vampyres and the undead here at Castle Tandaloor:

Nagy and Glatu the Gargoyles

  You'll also find a pair of Gargoyles. Here we have Nagy (on the left) and Glatu (on the right). Yeah, their boss is Vertu Mikto -- look it's no dumber than naming them after New York boroughs. Anyway, these two guys just lurk around the communing beds until some unwary adventurer passes them by and then Whammo! They were dirt easy to paint up (since I basically painted them the same way I painted the flooring) and I think they came out pretty well.

 So that's the whole necrotic bunch. There's just one more set of guys to paint up and then the whole set will be finished. I might actually try putting them on the table in the actual adventure written up for them. Although players will have to control an entire team...or maybe it'll be more of an ensamble game where people play different members of each group. We'll see.

Little Dudes of the Far Future

Hey,

 I've been pretty busy with a number of things the past couple of months but I haven't stopped painting up little dudes. I realized that I didn't show off the end of the New Vistula Legion (NVL) sci-fi forces I was painting up.

 So let's fix that. First up, some much needed heavy support:

NVL Heavy Weapon Teams

  You've got a pair of Heavy Machine Gun teams, a pair of Railgun Teams and two Mortar teams in the back. Considering the lack of vehicles for this group, they'll be depending on these guys for some time until I get a few toys for their motor pool.

  Finally, the big boss might drop by along with his retinue:

NVL Command Staff

  So you've got the overall commander, the staff sergeant, a communications officer, a couple of grunts and a driver/pilot. Although you can't see it really in this photo, the guy on the far right has a green mohawk. That was fun to do up.

  There was one more pack in the lot I picked up and that was a set of TV reporters. These guys seemed useful in both a futuristic and a modern day setting so I painted them up and gave them more of a desert base since I figure they'll probably see more modern-day Middle East/Africa action than far future stuff.

TV Crews

  Two reporters, two cameramen and two photo-journalists. It'll be nice to have these guys around mucking up the works and reporting on atrocities far and wide.

 Anyway, I'm happy to have these guys finished up. I can now play small battles with the sci-fi stuff I have so hopefully those guys will be hitting the table later this year.